Handling Page Load in Selenium Java

I’ve been immersed at work lately on a project and haven’t been able to post for the past few months. I wrote a blog last year about how to handle page loading times using C#. I also said in that blog that I wrote it java and some day will write about it. So today this is what I will post about and is long overdue.

So handling page loading times should be very important in all test automation frameworks. Especially when your AUT is not local or your accessing it through a VMware or something. The reason why from my experience is during writing your automation scripts, this is almost always a hurdle that you need to jump over multiple times. Often, this is why your scripts fail over and over in the initial phase of your automation script. Seeing that NoSuchElementException error can be hair pulling and I know exactly how you feel.

For my java projects that dealt with AUTs that were very ajax heavy, the sample code that I will share below was a life saver. Not only did they make my scripts stable, I saved a lot of time debugging those pesky inconsistent ‘Unable to locate element’ Exception errors that would pop up now and then. I would insert the method ‘WaitForPageLoad’ on all page transitions like from Login Page to Homepage or clicking a button that would trigger a pop up window, etc. It will be up to you to gauge where it will be needed for your automation scripts.

This is the main method to call within your scripts or modules. This will first wait for the DOM to be at readyState = complete. Then wait for ajax then back to the DOM readyState = complete.

public static void WaitForPageLoad(WebDriver driver)
{
      waitForDocumentLoad(driver);
      waitForAjaxLoad(driver);
      waitForDocumentLoad(driver);
}

This code will wait for DOM to be completed.


private static void waitForDocumentLoad(WebDriver driver)
{
        WebDriverWait wait = new WebDriverWait(driver, 30);
        wait.until(new ExpectedCondition<Boolean>() {
        public Boolean apply(WebDriver driver) {
        return ((JavascriptExecutor) driver).executeScript("return document.readyState").equals("complete");}}); 
 }

And lastly, the code to wait for Ajax to load.


private static void waitForAjaxLoad(WebDriver driver)
{
        WebDriverWait wait = new WebDriverWait(driver, 30);

        wait.until(new ExpectedCondition<Boolean>() {
        public Boolean apply(WebDriver driver) {
        return driver.findElements(By.cssSelector(".waiting, .tb-loading")).size() == 0;}});

}
How To Easily Install Selenium and TestNG in Eclipse with Maven

So recently I have been playing around with Maven in eclipse and just found out how ridiculously easy it is to install Selenium. I’ve been kicking myself for the past 15 minutes for not knowing about it sooner. I’ve enumerated how easy it is by setting it up with a new maven project. Read on.

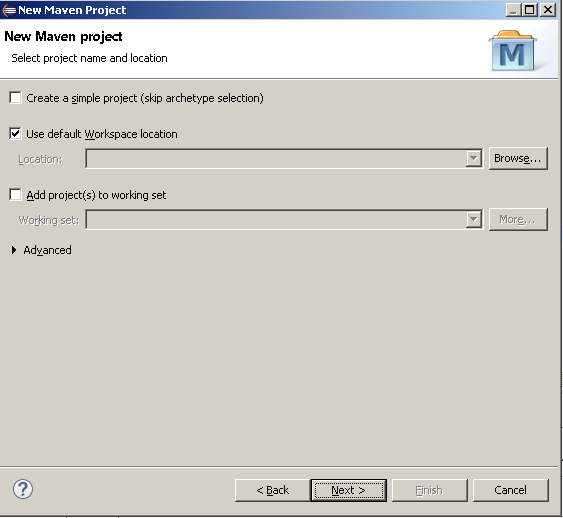
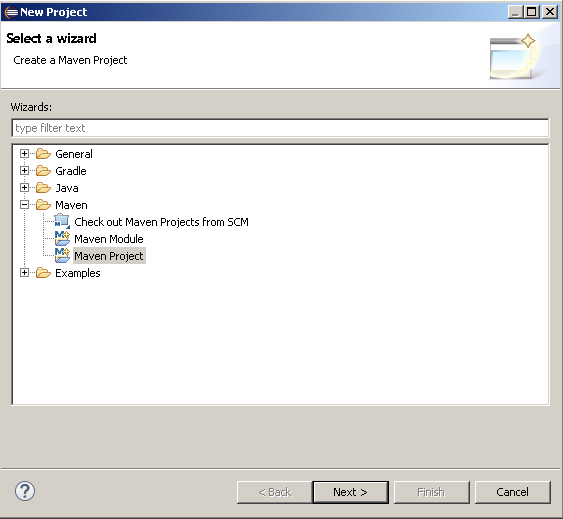
1. Create a new maven project in Eclipse.
NewProjectMaven

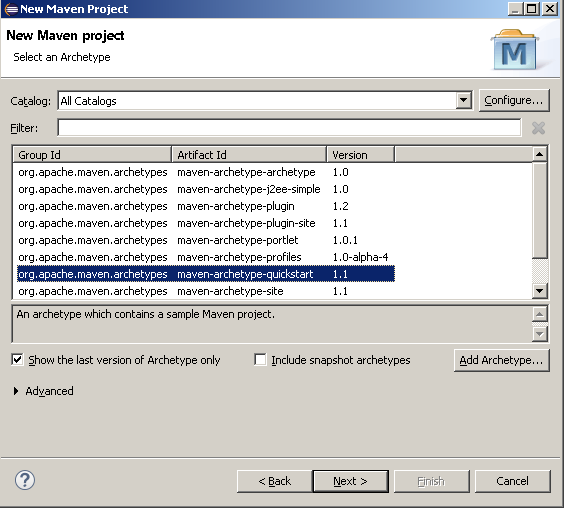
2. Click Next
NewProjectMaven2

3. Click Next for default quickstart Archetypes.
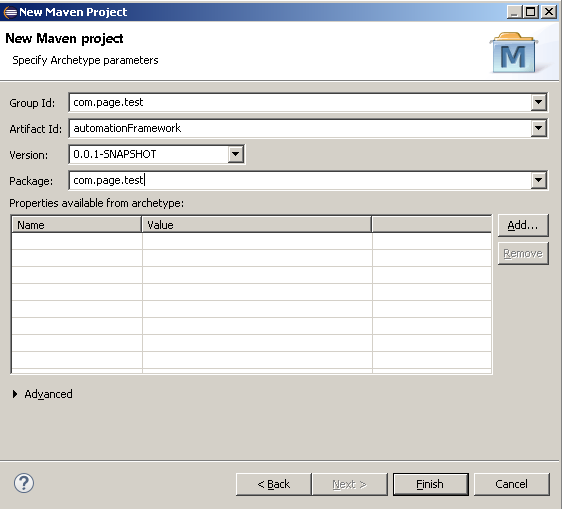
NewProjectMaven3

4. Fill out the Group id, Artifact id and click finish.
NewProjectMaven4

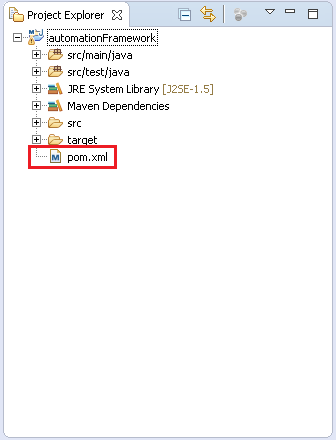
5. So you’ll end up with a project explorer looking like this. Click on the pom.xml.
Project Explorer

6. It’ll open the POM overview. Click on the pom.xml tab.
POM1

7. It’ll show the pom.xml structure. Notice the dependencies tag. It might have default dependencies like junit. Just ignore it.
POM2

8. Add in the dependency for Selenium and TestNG which can be acquired at http://mvnrepository.com.
POM3

9. Save pom.xml by hitting save or ctrl+s and wait for the workspace to build to 100%. Shown on status bar of eclipse.
BuildingWorkspace

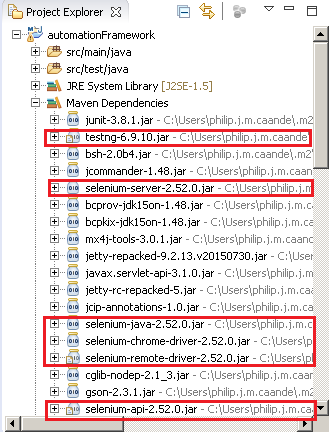
10. And your all set. You can check the jar files under Maven Dependencies in the project explorer.
Project Explorer2

Automate Windows File Upload in Rational Functional Tester

When automating tests in web applications, almost always there are test cases where you’ll need to upload or download a file. This can be done very easily in RFT since its object recognition technology can handle window based applications. This tool is perfect if the AUT utilizes both web and non-web applications interchangeably.

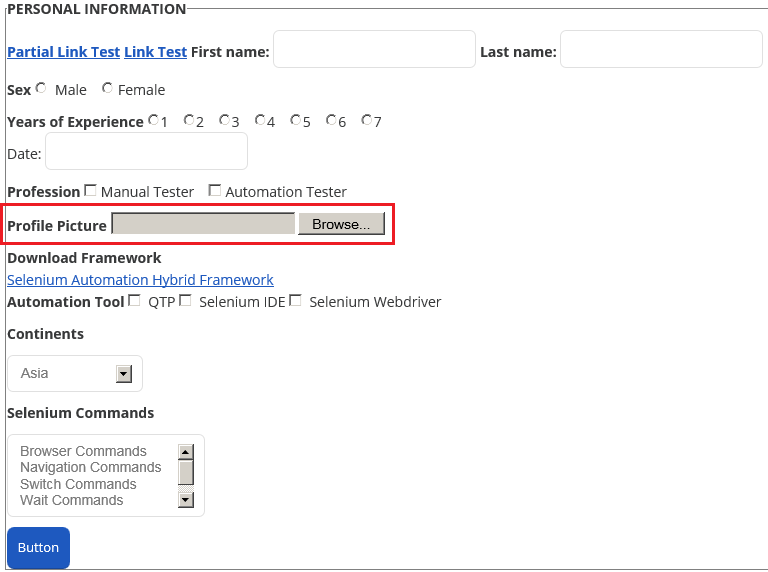
The application we’ll use again is the sample practice from toolsqa.  We will be focusing only on the Profile Picture field shown below.
ProfilePicture

Now before we can start, we need to know the path to a file that we will upload to the dialog window once it opens. In this case I created a sample dummy picture file located in “C:\ProfilePicture.png”.

If we’re lucky, there are times that the text box for the upload file is enabled and we can go ahead and send the path to the input box directly with below command.

TestObject link = find(atDescendant(".class", "Html.INPUT.file", ".id", "photo"))[0];
 ((TextGuiTestObject) link).setText("C:\\ProfilePicture.png");

But sometimes we’re not so lucky and the text box is grayed out like the one in our picture above and cannot be typed into. In this case we’ll need to access the dialog window by clicking the Browse button first then accessing its File Name text box. So how do we do this in RFT?

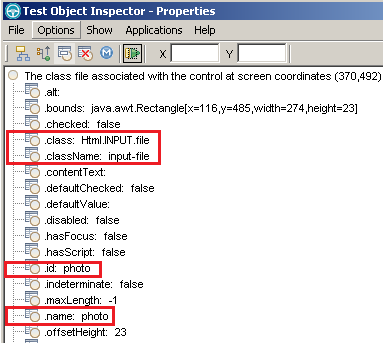
First, lets extract the browse button object properties in Test Object Inspector.
Browse


Property[] browseButtonProp = {atProperty(".class","Html.INPUT.file")
,atProperty(".className","input-file")
,atProperty(".id","photo")
,atProperty(".name","photo")
};
TestObject browseButton = find(atDescendant(browseButtonProp))[0];
((GuiTestObject) browseButton).click();

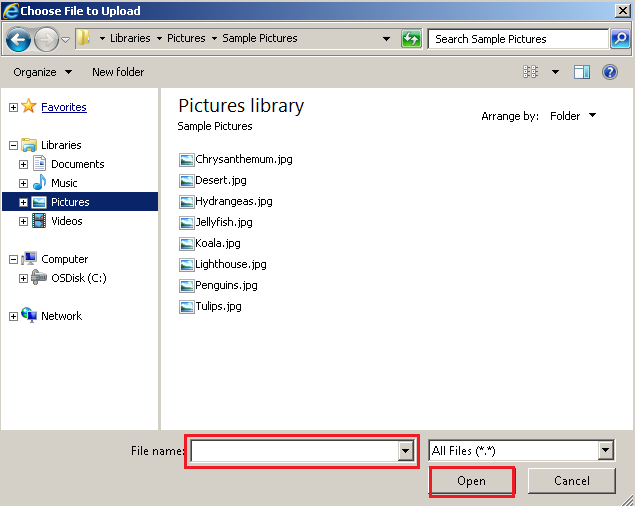
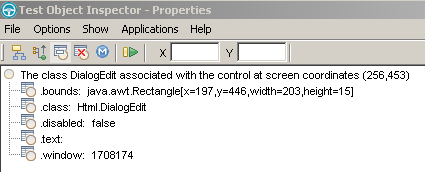
When clicked, a windows based dialog box will prompt.  Now we’ll need to get the object properties for the File name input box and the Open button highlighted below in red.

DialogWindow

Properties for File Name text input box:
filenameprop

Use find method to store its property in TestObject filename. Then use setProperty to change its “.text” value to the file path.


TestObject filename = find(atDescendant(".class","Html.DialogEdit"))[0];
filename.setProperty(".text", "C:\\ProfilePicture.png");

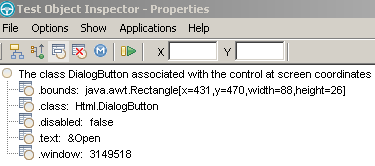
Properties for Open button.

okbuttonprop


TestObject openButton = find(atDescendant(".class","Html.DialogButton", ".text", "&Open"))[0];
((GuiTestObject) openButton).click();

When the actions above have been executed successfully, we can then check if the path is entered corrected in the Profile Picture text box.

ProfilePicture_After

Now you’re all set!

Recognizing Different Types of Objects in Rational Functional Tester through TestObject.find Method

Adding test objects in the object map should be the primary choice for an automation framework if you are using RFT. I worked on a project with automating a windows based application and this was a perfect example for that method. Since windows based applications have less changes in their objects that type of approach works.

There are cases however in my opinion that using the find method is more advantageous. In web applications for example, the web elements are more prone to frequent changes in their properties like the id or name. Last blog I lightly touched on the subject of recognizing Test Objects with RFT using the find method. In this post I will try to cover different types of objects with different actions using the RFT interfaces package. The Test Object Inspector (TOI) in RFT will also be used to extract the object properties. The TOI is very useful when you have to quickly peek at the object properties. It becomes handy during scripting as well as troubleshooting and maintaining your automation scripts.

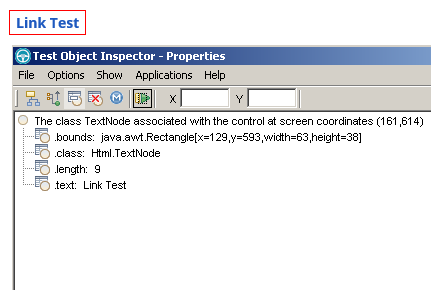
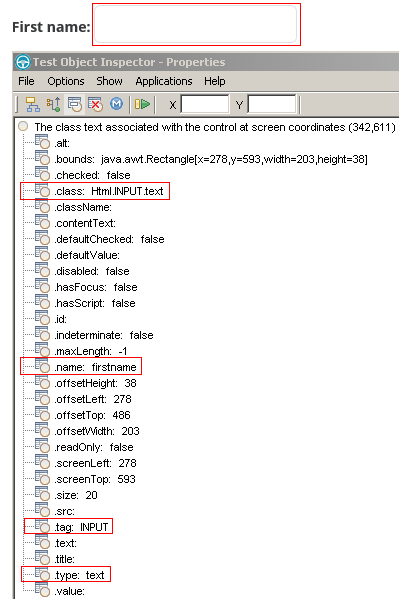
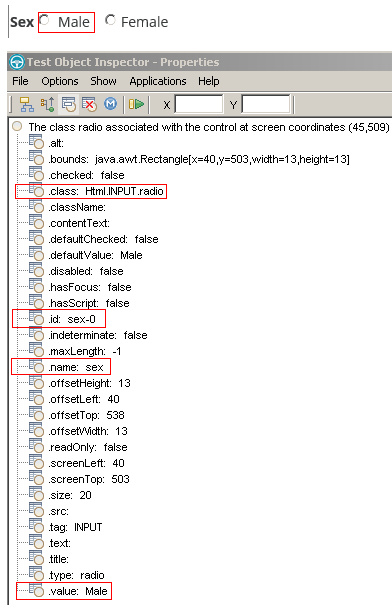
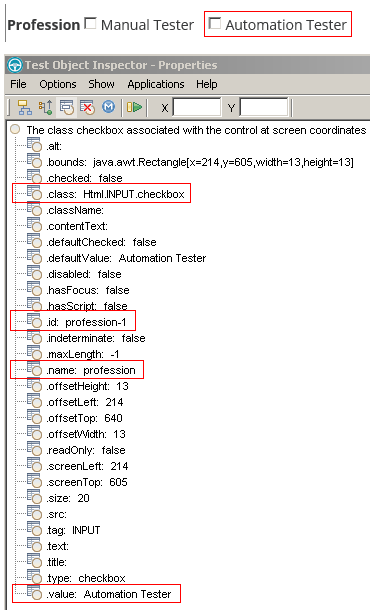
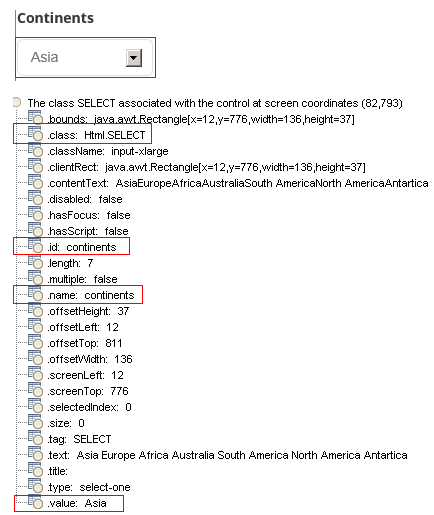
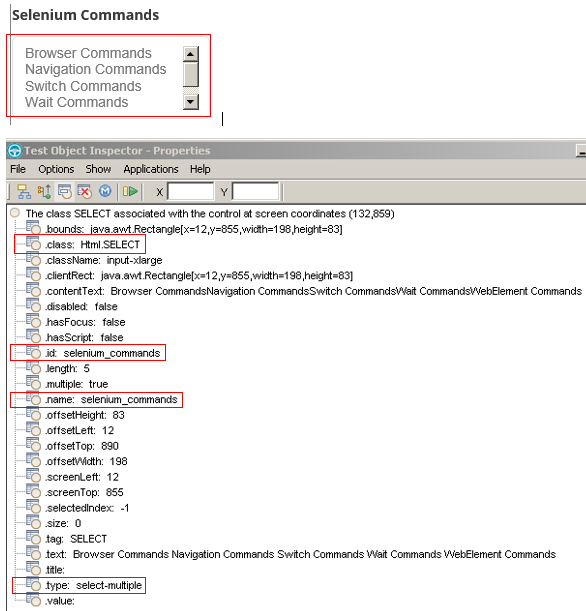
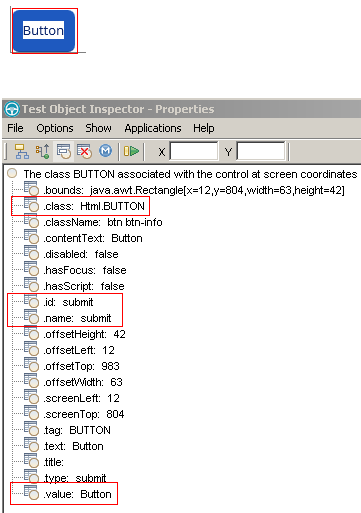
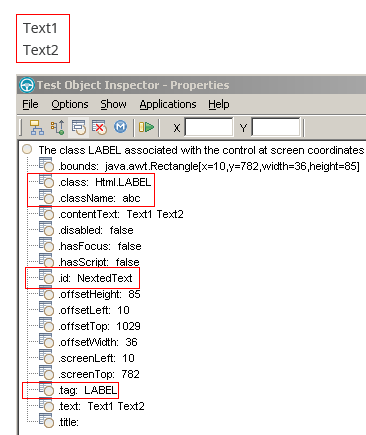
The web test application used is the practice form in toolsqa. Note that any attribute can be used on the given object provided it has a value. In this case, the attributes used have been highlighted in red.

Link
Link


TestObject link = find(atDescendant(".class", "Html.TextNode", ".text", "Link Test"))[0];
((GuiTestObject) link).click();


Text Box
TextBox


Property[] textBoxProp ={atProperty(".class","Html.INPUT.text")
,atProperty(".name","firstname")
,atProperty(".tag","INPUT")
,atProperty(".type","text")
};

TestObject textBox = find(atDescendant(textBoxProp))[0];
((TextGuiTestObject) textBox).setText("Philip");


Radio Button
RadioButton


Property[] radioButtonProp = {atProperty(".class","Html.INPUT.radio")
 ,atProperty(".id","sex-0")
 ,atProperty(".name","sex")
 ,atProperty(".value","Male")
};
TestObject radiobutton = find(atDescendant(radioButtonProp))[0];
((ToggleTestObject) radiobutton).setState(SELECTED);


Check Box
CheckBox

Property[] checkBoxProp = {atProperty(".class","Html.INPUT.checkbox")
,atProperty(".id","profession-1")
,atProperty(".name","profession")
,atProperty(".value","Automation Tester")
};
TestObject checkbox = find(atDescendant(checkBoxProp))[0];
((ToggleTestObject) checkbox).setState(SELECTED);


Drop Down
DropDown


Property[] dropDownProp = {atProperty(".class","Html.SELECT")
,atProperty(".id","continents")
,atProperty(".name","continents")
,atProperty(".value","Asia")
};
TestObject dropdown = find(atDescendant(dropDownProp))[0];
((SelectGuiSubitemTestObject) dropdown).select("Australia");


List
List


Property[] listProp = {atProperty(".class","Html.SELECT")
,atProperty(".id","selenium_commands")
,atProperty(".name","selenium_commands")
,atProperty(".type","select-multiple")
};
TestObject list = find(atDescendant(listProp))[0];
((SelectGuiSubitemTestObject) list).select("Switch Commands");
((SelectGuiSubitemTestObject) list).select("WebElement Commands");

Button
Button


Property[] buttonProp = {atProperty(".class","Html.BUTTON")
,atProperty(".id","submit")
,atProperty(".name","submit")
,atProperty(".value","Button")
};
TestObject button = find(atDescendant(buttonProp))[0];
((GuiTestObject) button).click();

Text Label
TextLabel

Property[] textLabelProp = {atProperty(".class","Html.SELECT")
,atProperty(".className","abc")
,atProperty(".id","NextedText")
,atProperty(".tag","Asia")
};
TestObject textlabel = find(atDescendant(textLabelProp))[0];
String Text = ((TextGuiTestObject) textlabel).getText();
logInfo(Text);


Use Code for Object Recognition in Rational Functional Tester

In my previous post I said I would create a blog about how to add test objects in RFT but I found a comprehensive blog that teaches this and more. It can be found here. So on this blog I will show how to add dynamic objects through java code. The TestObject.find is a method that finds the test object dynamically during run-time. One of the benefits for using this method is script maintainability. With stored static objects, updating them could be time consuming as you’d have to re-record or re-insert the test objects or update the property weight values. This method will eliminate mostly all recorded controls from the Object Map.

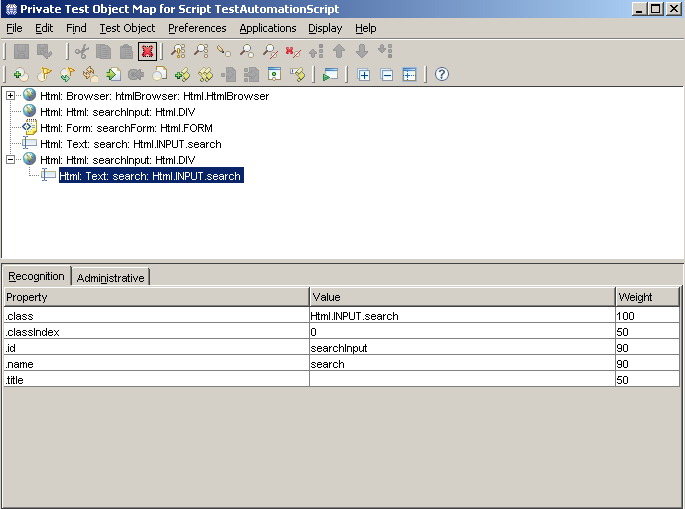
For this example I used a text box in wikipedia page. The textbox has already been added to the Object Map and if you look at the object properties it can look something like this.

ObjectPropertyWindow

The property values seen on the screenshot above can be used to pass to the TestObject.find method to detect this particular text box without recording or adding it to the Object Map. To use the find method, you could use something like this:

TestObject searchTextBox = find(atDescendant(".class", "Html.INPUT.search", ".id", "searchInput"))[0];

To find the object faster, you could use all 4 of the given values.

Property[] textboxProp = {atProperty(".class","Html.INPUT.search")
        ,atProperty(".classIndex","0")
        ,atProperty(".id","searchInput")
        ,atProperty(".name","search")
        };

TestObject searchTextBox = find(atDescendant(textboxProp))[0];

Once the Test Object has been instantiated, an action can now be used like typing in a value in the searchbox.

((TextGuiTestObject)searchTextBox).setText("Automation Test");

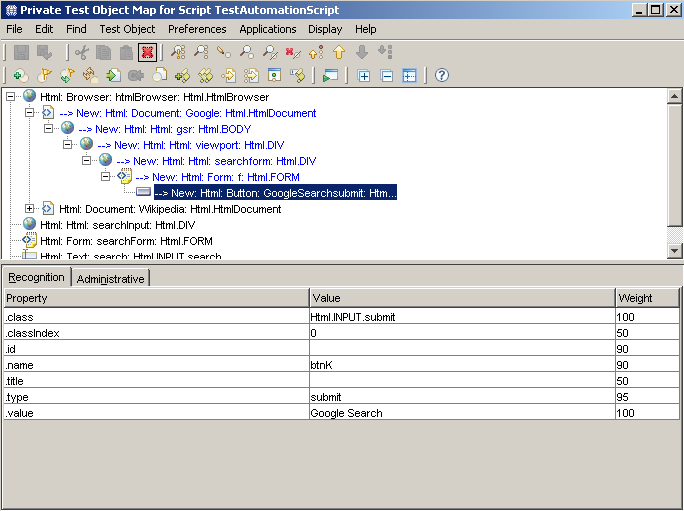
Lets try another type of object like the submit button in google.com.
submtbuttonproperty

For the google submit button, using 4 of the properties can be called into the find method.

Property[] searchButtonProp = {atProperty(".class","Html.INPUT.submit")
,atProperty(".name","btnK")
,atProperty(".type","submit")
,atProperty(".value","Google Search")
};

TestObject searchButton = find(atDescendant(searchButtonProp))[0];
((GuiTestObject)searchButton).click();