Handling Page Load in Selenium Java

I’ve been immersed at work lately on a project and haven’t been able to post for the past few months. I wrote a blog last year about how to handle page loading times using C#. I also said in that blog that I wrote it java and some day will write about it. So today this is what I will post about and is long overdue.

So handling page loading times should be very important in all test automation frameworks. Especially when your AUT is not local or your accessing it through a VMware or something. The reason why from my experience is during writing your automation scripts, this is almost always a hurdle that you need to jump over multiple times. Often, this is why your scripts fail over and over in the initial phase of your automation script. Seeing that NoSuchElementException error can be hair pulling and I know exactly how you feel.

For my java projects that dealt with AUTs that were very ajax heavy, the sample code that I will share below was a life saver. Not only did they make my scripts stable, I saved a lot of time debugging those pesky inconsistent ‘Unable to locate element’ Exception errors that would pop up now and then. I would insert the method ‘WaitForPageLoad’ on all page transitions like from Login Page to Homepage or clicking a button that would trigger a pop up window, etc. It will be up to you to gauge where it will be needed for your automation scripts.

This is the main method to call within your scripts or modules. This will first wait for the DOM to be at readyState = complete. Then wait for ajax then back to the DOM readyState = complete.

public static void WaitForPageLoad(WebDriver driver)
{
      waitForDocumentLoad(driver);
      waitForAjaxLoad(driver);
      waitForDocumentLoad(driver);
}

This code will wait for DOM to be completed.


private static void waitForDocumentLoad(WebDriver driver)
{
        WebDriverWait wait = new WebDriverWait(driver, 30);
        wait.until(new ExpectedCondition<Boolean>() {
        public Boolean apply(WebDriver driver) {
        return ((JavascriptExecutor) driver).executeScript("return document.readyState").equals("complete");}}); 
 }

And lastly, the code to wait for Ajax to load.


private static void waitForAjaxLoad(WebDriver driver)
{
        WebDriverWait wait = new WebDriverWait(driver, 30);

        wait.until(new ExpectedCondition<Boolean>() {
        public Boolean apply(WebDriver driver) {
        return driver.findElements(By.cssSelector(".waiting, .tb-loading")).size() == 0;}});

}

iFrame in Selenium C#

An iFrame is an embedded document that is inside another HTML document. You can normally see an iframe in the html tree under or in a <iframe> tag. Usually the first sign there is an iframe in your AUT is when selenium is not detecting a web element and you don’t know why. They are a bit tricky because you will need to instruct selenium to switch to it in order to access its web elements. Then you’ll need to switch back if you need to access elements outside of that iframe. There are some web applications that make matters worse when their iframes do not have id properties or generate a random one. But we’ll talk about that later. In Selenium C#, in order to handle these frames there are several methods we can use with IWebDriver.SwitchTo().

  • SwitchTo().DefaultContent() – Selects either the first frame on the page or the main document when a page contains iFrames.
  • SwitchTo().Frame(int frameIndex) – Select a frame by its (zero-based) index.
  • SwitchTo().Frame(IWebElement frameElement) – Select a frame using its previously located OpenQA.Selenium.IWebElement.
  • SwitchTo().Frame(string frameName) – Select a frame by its name or ID.
  • SwitchTo().ParentFrame() – Select the parent frame of the currently selected frame.

More details can be found in the interface ITargetLocator of Selenium.

Switch to a frame by Index

Before we can learn to switch to an iframe by index, we first need to know how many and which iframe to switch to. This approach can also help you if the iframe id/name is not given or if they are auto generated values.


List<IWebElement> frames = new List<IWebElement>(driver.FindElements(By.TagName("iframe")));
Console.WriteLine("Number of Frames: " + frames.Count);
for (int i = 0; i < frames.Count; i++)
{
Console.WriteLine("frame[" + i + "]: " + frames[i].GetAttribute("id").ToString());
}

Now that we know which iframe we want, we can then simply pass the index.

driver.SwitchTo().Frame(0);

Switch to a frame by IWebElement

IWebElement iframe = driver.FindElement(By.Id("iframe1"));
driver.SwitchTo().Frame(iframe);


Alternately we can use the first or last syntax from the List we created above.

</pre>
<pre>List<IWebElement> frames = new List<IWebElement>(driver.FindElements(By.TagName("iframe")));
driver.SwitchTo().Frame(frames.First());
driver.SwitchTo().Frame(frames.Last())


 Switch to a frame by Name of ID

driver.SwitchTo().Frame(("iframe1");

Switch back to the default document or the parent frame

In order to access the elements in the default document you’ll need to switch back out if you are currently in an iframe.

driver.SwitchTo().DefaultContent();


If the AUT has nested iframes, you can switch back out to the parent frame.

driver.SwitchTo().ParentFrame();

How To Easily Install Selenium and TestNG in Eclipse with Maven

So recently I have been playing around with Maven in eclipse and just found out how ridiculously easy it is to install Selenium. I’ve been kicking myself for the past 15 minutes for not knowing about it sooner. I’ve enumerated how easy it is by setting it up with a new maven project. Read on.

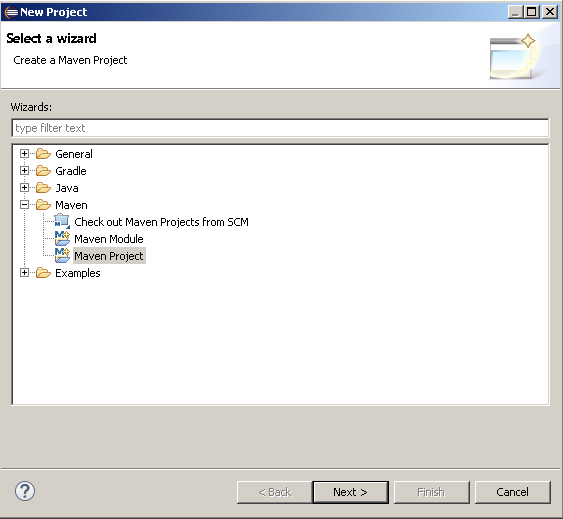
1. Create a new maven project in Eclipse.
NewProjectMaven

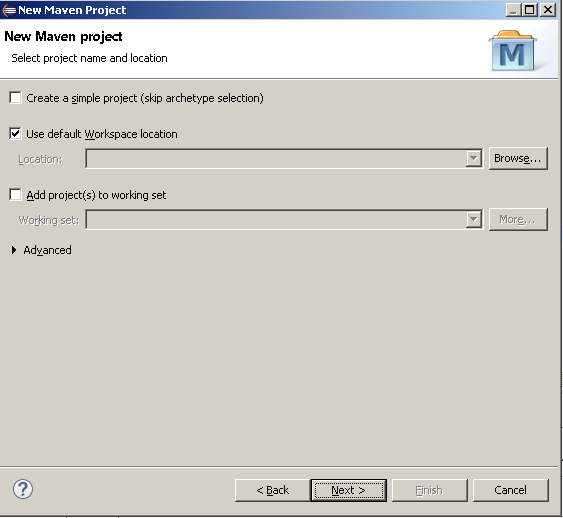
2. Click Next
NewProjectMaven2

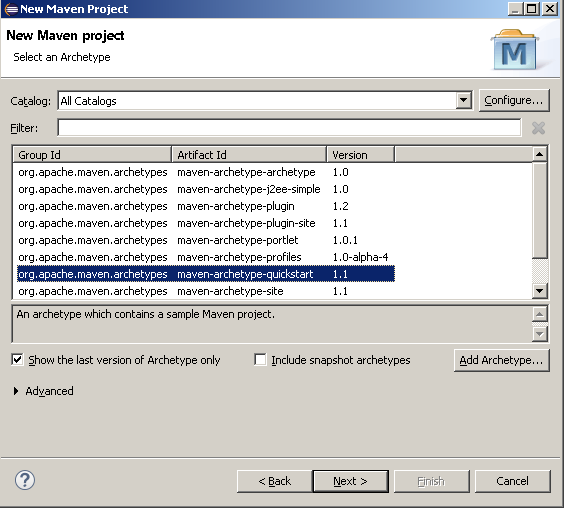
3. Click Next for default quickstart Archetypes.
NewProjectMaven3

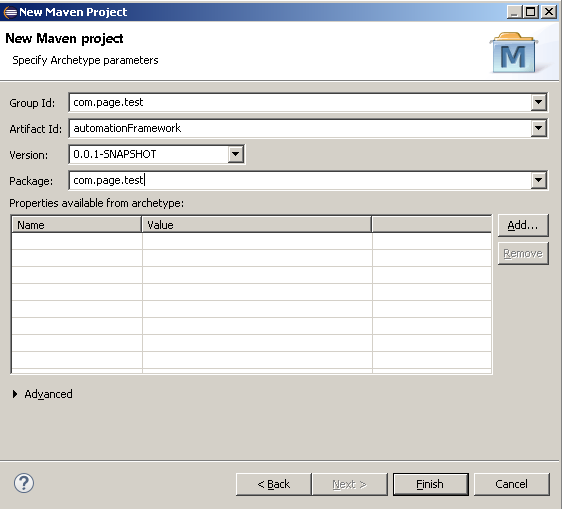
4. Fill out the Group id, Artifact id and click finish.
NewProjectMaven4

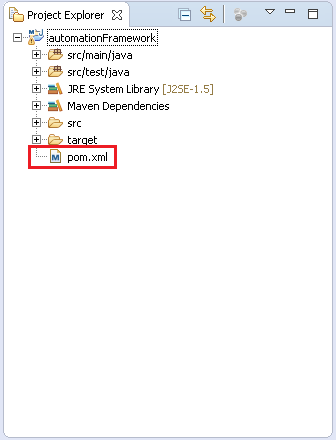
5. So you’ll end up with a project explorer looking like this. Click on the pom.xml.
Project Explorer

6. It’ll open the POM overview. Click on the pom.xml tab.
POM1

7. It’ll show the pom.xml structure. Notice the dependencies tag. It might have default dependencies like junit. Just ignore it.
POM2

8. Add in the dependency for Selenium and TestNG which can be acquired at http://mvnrepository.com.
POM3

9. Save pom.xml by hitting save or ctrl+s and wait for the workspace to build to 100%. Shown on status bar of eclipse.
BuildingWorkspace

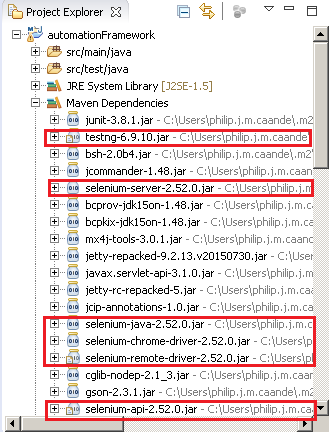
10. And your all set. You can check the jar files under Maven Dependencies in the project explorer.
Project Explorer2

Handling StaleElementReferenceException

So recently I have been working on a project that automated a very ajax and javascript heavy web application. So for object recognition this can be a headache if you don’t handle your page load timings and whatnot correctly. The exception errors that I inconsistently get was this StaleElementReferenceException which I didn’t know how to debug. So I had to do some research online. Turns out that there are DOM operations during page loads and Selenium will throw an error when you are trying to access an element during these changes. This happened to me numerous times due to the Page Object pattern with Page Factory design on my automation framework.

To workaround this, I surrounded my method with a try catch like below.


  @FindBy(how = How.ID, using = "button")
  private static WebElement loginbutton;

  public static void clickObject(By by)
  {
     try{
         loginbutton.click();
     }
     catch(StaleElementReferenceException e)
     {
         driver.findElement(by).click();
     }
   }

This will catch the stale element exception and perform a new find operation to the refreshed or loaded element.

Or you can use a while loop that will click again in case the exception is thrown.

public boolean retryingFindClick(By by) {
        boolean result = false;
        int attempts = 0;
        while(attempts < 2) {
            try {
                driver.findElement(by).click();
                result = true;
                break;
            } catch(StaleElementException e) {
            }
            attempts++;
        }
        return result;
}

The code with while loop above you can read more about here:
http://darrellgrainger.blogspot.com/2012/06/staleelementexception.html

5 Automation Testing Tips for Beginners

Time and time again I hear a lot of my coworkers say things along the lines of “You know how to automate testing? Cool! I wish I knew how do to that!” Well truth is, its not at all that hard. People get the notion that automation is pure coding and that it requires to have deep knowledge in object oriented programming like java, c#, or python. Well you don’t. Programming is all about thinking logically and yes we all know how to do that. Yes you need to learn the different syntax of the languages but a quick google search can do that for you. Even developers do it. So if you’ve been put off by these silly impressions these 5 tips just might reel you in.

1. If your not already a tester, learn how to test.

Testing is one of the easiest parts of software development. Now I’m not saying all testing are easy. Don’t get me wrong. There were times I wanted to flip desks at work because of defects that slipped to production that made us all go, “how the hell didn’t we see that?” The concepts and processes are easy to understand. Little to no technical ability is really needed when you’re following a step by step Test Script. Testing is a foundation to automation. If you know how to automate but don’t know jack about testing, sorry you’re a developer or an automater. Not an Automation Tester. There are several good books out there that can send you along the way like The ART of Testing by Glenford J. Myers and How We Test Software by Microsoft.

2. Pick an Automation tool.

Back when I started I only knew about 2, Rational Functional Tester and QTP when they were still Mercury back in the day. Now there are so many – Selenium, Worksoft Certify, AutoIt, TestComplete, and many more. A few of them don’t even need for you to code like Worksoft. Most offer a recording function so nowadays all you need to do is enter this, click that and you have an automated test script! But personally to reach a level of high quality and re-usability for your scripts, you’ll need a coders touch. Pick one that has both so when you’re at a comfortable level you can start adding your sourcery to your recordings.

3. Pick an easy language for you

If you dont already have one, there are a bunch to choose from. Most popular languages in automation are java, c# .net, and python. Most tools support these languages and more. I chose java because of the C programming background I had back in college. Find one you have something in common with. Your Moms name is Ruby. Your favorite popstar is Taylor Swift. Your favorite Starbucks drink is javachip. Whatever. Once you’ve chosen your weapon of choice, start the learning. Pick an IDE for that language and start doing sample basic coding lessons. There are several free sites that offer practice problems. See hackerrank.com. They also let you chose from a variety of languages.

4. Learn how to code, even just a little bit.

Now I said up there that you didn’t need to have deep knowledge in programming which is true. You don’t need to know advanced concepts of algorithms like Dijkstra, graph theory, and dynamic programming to learn automation testing. Out of all the years I’ve been in Automation, my most complex code written on a test was probably a bubble sort. It just isn’t necessary. Leave those to the developers.

5. Start by recording

For non coders to start automating, recording is the best way to go. Having to see what the code equivalent is to each one of your actions is almost cheating. You will know how to read the code immediately, giving you almost like a step by step programming lesson. The only problem with recording in some tools like RFT is how static the actions are. In RFT, the click command has x,y coordinates on the screen. This is a big hell No in automation. This is where you’ll need to wizardly intervene. There are some advanced tools however that don’t need you to. It really is up to you. But from an automation tester that codes, there is this knowing of having complete control when you can code your tests. But who’s to say whats better. Not to sound cliche but the choice really is yours or your company’s. But either way Start automating your tests!

Selenium: Wait for Page to load

Handling the page loading times for web automation can be really frustrating. Especially when you think your scripts are all 100% working until you run one and it fails on a NoSuchElement exception. A lot of web applications now are very ajax heavy meaning even when selenium detects that your element is present  and loaded there are still parts of the application loading. You can test this by executing a screenshot after your findElement code and you’ll see that the page is not totally loaded. You can find numerous solutions online but several doesn’t quite do the trick. There is one however that worked for my case and it can be found at Brantley’s blog.

The method works because it checks for three things. First, it checks if the normal load page is complete. Then it will wait for if any ajax requests to load and lastly it will check again for the normal page to complete. The code used on my case can be found below. All credit belongs to the original poster in the link above, the code has been tweaked a little to work on my particular project .

To call the whole thing which is located in a class called Wait.


Wait.WaitForReady(driver, TimeSpan.FromSeconds(120));

In the Wait class, a wait until is called.

public void WaitForReady(IWebDriver driver, TimeSpan seconds)
{
    WebDriverWait wait = new WebDriverWait(driver, seconds);
    wait.Until(d =>
    {
        return WaitForPageLoad(driver, seconds);
    });
}
A Method that will do three checks.

public static bool WaitForPageLoad(IWebDriver driver, TimeSpan waitTime)
        {
            WaitForDocumentReady(driver, waitTime);
            bool ajaxReady = WaitForAjaxReady(driver, waitTime);
            WaitForDocumentReady(driver, waitTime);
            return ajaxReady;
        }

The method for page load.

private static void WaitForDocumentReady(IWebDriver driver, TimeSpan waitTime)
        {
            var wait = new WebDriverWait(driver, waitTime);
            var javascript = driver as IJavaScriptExecutor;
            if (javascript == null)
                throw new ArgumentException("driver", "Driver must support javascript execution");

            wait.Until((d) =>
            {
                try
                {
                    string readyState = javascript.ExecuteScript(
                        "if (document.readyState) return document.readyState;").ToString();
                    return readyState.ToLower() == "complete";
                }
                catch (InvalidOperationException e)
                {
                    return e.Message.ToLower().Contains("unable to get browser");
                }
                catch (WebDriverException e)
                {
                    return e.Message.ToLower().Contains("unable to connect");
                }
                catch (Exception)
                {
                    return false;
                }
            });
        }
A method that will wait for (if any) Ajax requests.

private static bool WaitForAjaxReady(IWebDriver driver, TimeSpan waitTime)
        {
            System.Threading.Thread.Sleep(1000);
            WebDriverWait wait = new WebDriverWait(driver, waitTime);
            return wait.Until<bool>((d) =>
            {
                return driver.FindElements(By.CssSelector(".waiting, .tb-loading")).Count == 0;
            });
        }

This greatly helped in script stability for my c# projects. I managed to also write this in java which I will do a later post on.

Recognizing Different Types of Objects in Rational Functional Tester through TestObject.find Method

Adding test objects in the object map should be the primary choice for an automation framework if you are using RFT. I worked on a project with automating a windows based application and this was a perfect example for that method. Since windows based applications have less changes in their objects that type of approach works.

There are cases however in my opinion that using the find method is more advantageous. In web applications for example, the web elements are more prone to frequent changes in their properties like the id or name. Last blog I lightly touched on the subject of recognizing Test Objects with RFT using the find method. In this post I will try to cover different types of objects with different actions using the RFT interfaces package. The Test Object Inspector (TOI) in RFT will also be used to extract the object properties. The TOI is very useful when you have to quickly peek at the object properties. It becomes handy during scripting as well as troubleshooting and maintaining your automation scripts.

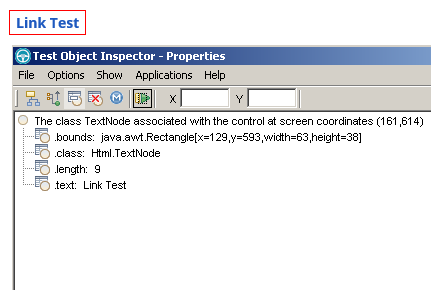
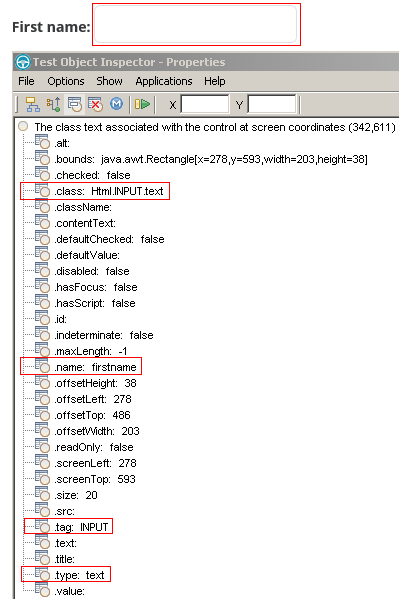
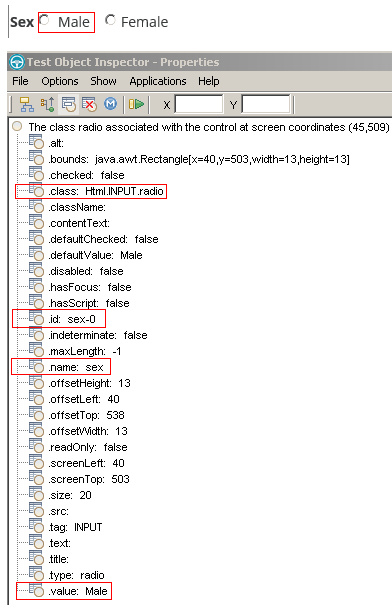
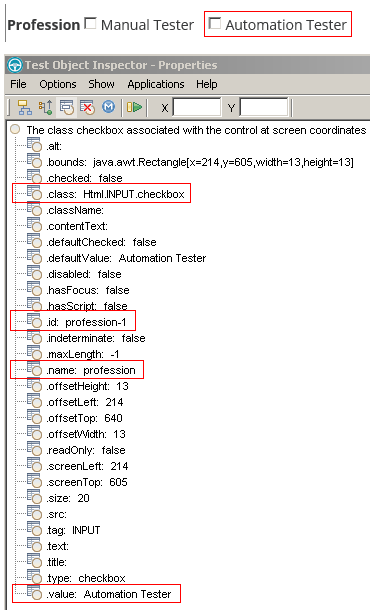
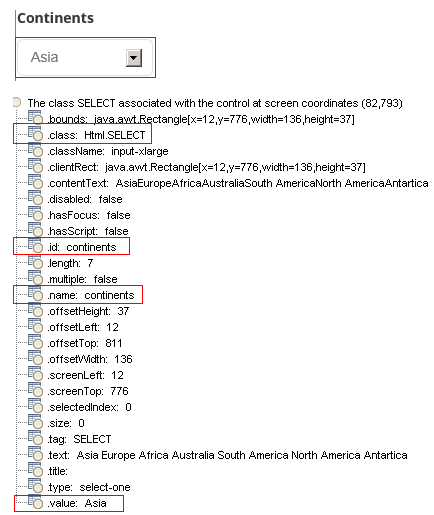
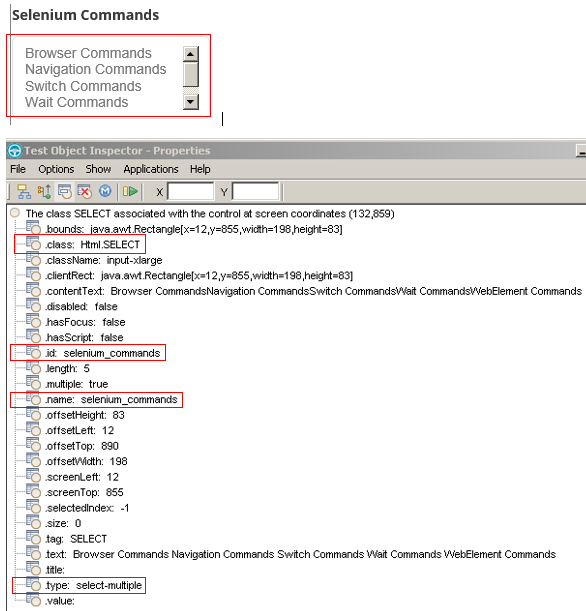
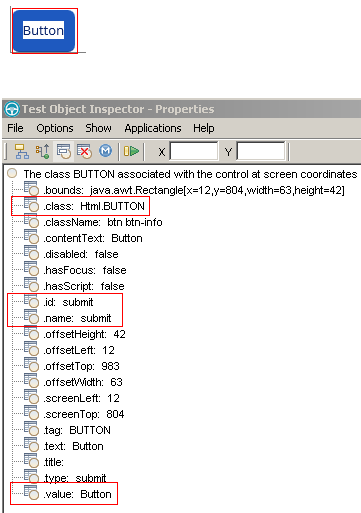
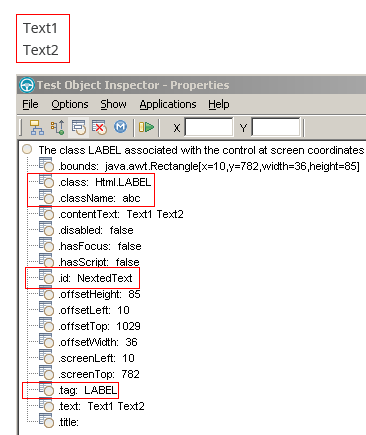
The web test application used is the practice form in toolsqa. Note that any attribute can be used on the given object provided it has a value. In this case, the attributes used have been highlighted in red.

Link
Link


TestObject link = find(atDescendant(".class", "Html.TextNode", ".text", "Link Test"))[0];
((GuiTestObject) link).click();


Text Box
TextBox


Property[] textBoxProp ={atProperty(".class","Html.INPUT.text")
,atProperty(".name","firstname")
,atProperty(".tag","INPUT")
,atProperty(".type","text")
};

TestObject textBox = find(atDescendant(textBoxProp))[0];
((TextGuiTestObject) textBox).setText("Philip");


Radio Button
RadioButton


Property[] radioButtonProp = {atProperty(".class","Html.INPUT.radio")
 ,atProperty(".id","sex-0")
 ,atProperty(".name","sex")
 ,atProperty(".value","Male")
};
TestObject radiobutton = find(atDescendant(radioButtonProp))[0];
((ToggleTestObject) radiobutton).setState(SELECTED);


Check Box
CheckBox

Property[] checkBoxProp = {atProperty(".class","Html.INPUT.checkbox")
,atProperty(".id","profession-1")
,atProperty(".name","profession")
,atProperty(".value","Automation Tester")
};
TestObject checkbox = find(atDescendant(checkBoxProp))[0];
((ToggleTestObject) checkbox).setState(SELECTED);


Drop Down
DropDown


Property[] dropDownProp = {atProperty(".class","Html.SELECT")
,atProperty(".id","continents")
,atProperty(".name","continents")
,atProperty(".value","Asia")
};
TestObject dropdown = find(atDescendant(dropDownProp))[0];
((SelectGuiSubitemTestObject) dropdown).select("Australia");


List
List


Property[] listProp = {atProperty(".class","Html.SELECT")
,atProperty(".id","selenium_commands")
,atProperty(".name","selenium_commands")
,atProperty(".type","select-multiple")
};
TestObject list = find(atDescendant(listProp))[0];
((SelectGuiSubitemTestObject) list).select("Switch Commands");
((SelectGuiSubitemTestObject) list).select("WebElement Commands");

Button
Button


Property[] buttonProp = {atProperty(".class","Html.BUTTON")
,atProperty(".id","submit")
,atProperty(".name","submit")
,atProperty(".value","Button")
};
TestObject button = find(atDescendant(buttonProp))[0];
((GuiTestObject) button).click();

Text Label
TextLabel

Property[] textLabelProp = {atProperty(".class","Html.SELECT")
,atProperty(".className","abc")
,atProperty(".id","NextedText")
,atProperty(".tag","Asia")
};
TestObject textlabel = find(atDescendant(textLabelProp))[0];
String Text = ((TextGuiTestObject) textlabel).getText();
logInfo(Text);


Use Code for Object Recognition in Rational Functional Tester

In my previous post I said I would create a blog about how to add test objects in RFT but I found a comprehensive blog that teaches this and more. It can be found here. So on this blog I will show how to add dynamic objects through java code. The TestObject.find is a method that finds the test object dynamically during run-time. One of the benefits for using this method is script maintainability. With stored static objects, updating them could be time consuming as you’d have to re-record or re-insert the test objects or update the property weight values. This method will eliminate mostly all recorded controls from the Object Map.

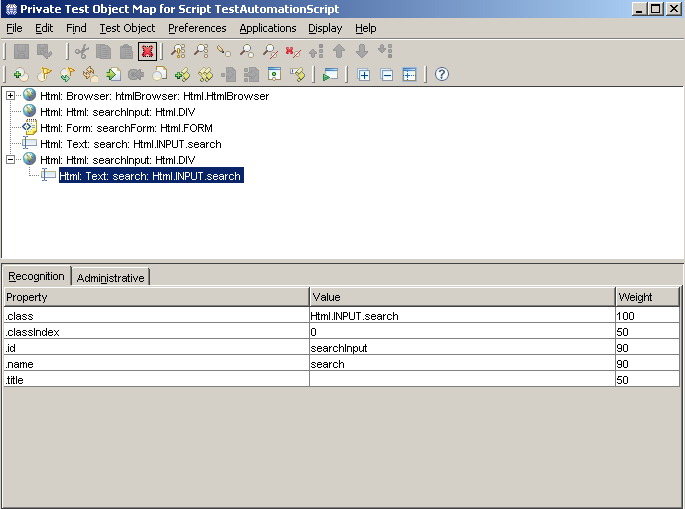
For this example I used a text box in wikipedia page. The textbox has already been added to the Object Map and if you look at the object properties it can look something like this.

ObjectPropertyWindow

The property values seen on the screenshot above can be used to pass to the TestObject.find method to detect this particular text box without recording or adding it to the Object Map. To use the find method, you could use something like this:

TestObject searchTextBox = find(atDescendant(".class", "Html.INPUT.search", ".id", "searchInput"))[0];

To find the object faster, you could use all 4 of the given values.

Property[] textboxProp = {atProperty(".class","Html.INPUT.search")
        ,atProperty(".classIndex","0")
        ,atProperty(".id","searchInput")
        ,atProperty(".name","search")
        };

TestObject searchTextBox = find(atDescendant(textboxProp))[0];

Once the Test Object has been instantiated, an action can now be used like typing in a value in the searchbox.

((TextGuiTestObject)searchTextBox).setText("Automation Test");

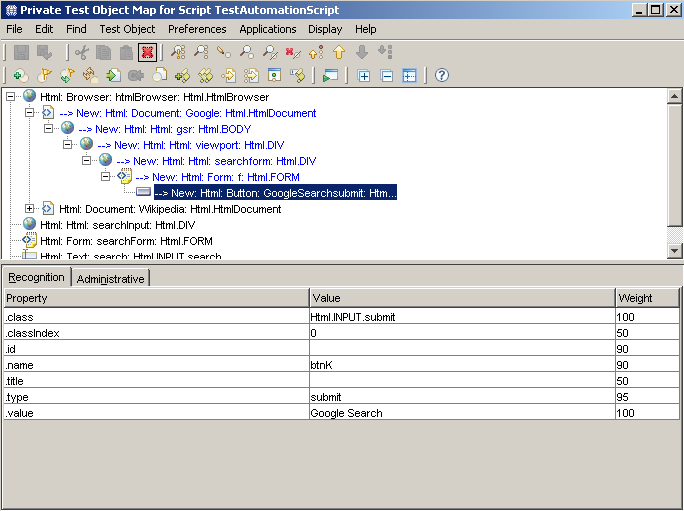
Lets try another type of object like the submit button in google.com.
submtbuttonproperty

For the google submit button, using 4 of the properties can be called into the find method.

Property[] searchButtonProp = {atProperty(".class","Html.INPUT.submit")
,atProperty(".name","btnK")
,atProperty(".type","submit")
,atProperty(".value","Google Search")
};

TestObject searchButton = find(atDescendant(searchButtonProp))[0];
((GuiTestObject)searchButton).click();

RFT: How To Create a Workspace, Project and Test Script

On my previous post I covered how to install RFT. Great. Now let’s move on to the more important things. In this post I will cover how to create a workspace, a project and a basic automation script.

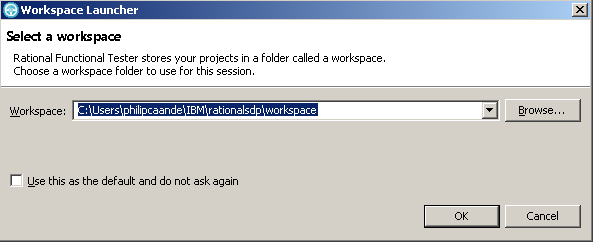
  1. Create a Workspace. The default workspace looks something like this. You can choose any path you’d like for your workspace. For now this is fine. Click OK.
    RFT01
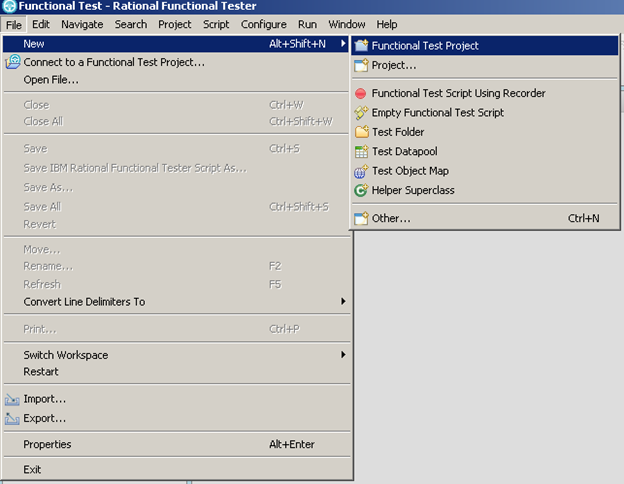
  2. Click on File > New > Functional Test Project
    RFT02
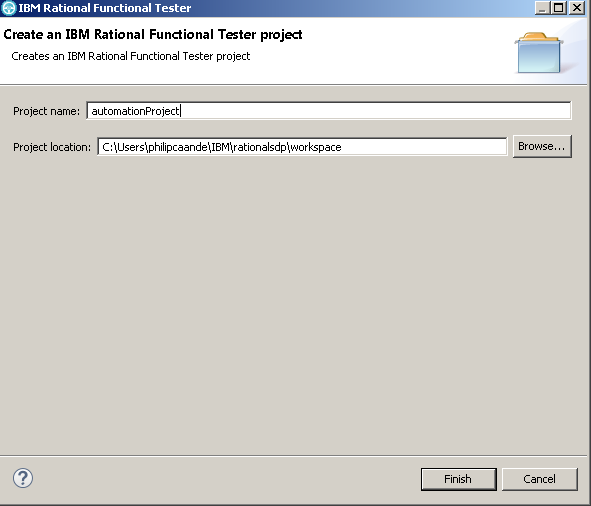
  3. Give it a name. (e.g. automationProject) then click Finish.
    RFT03
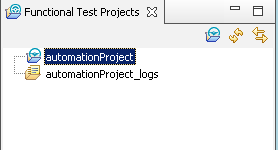
  4. Your empty project explorer should look something like this.
    RFT04
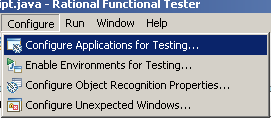
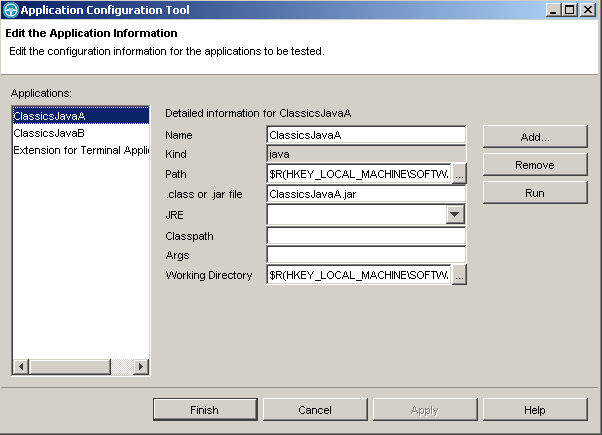
  5. Before creating a script, we need to setup the Application under Test. Under Configure, click Configure applications for test.
    RFT05
  6. Click Add
    RFT06
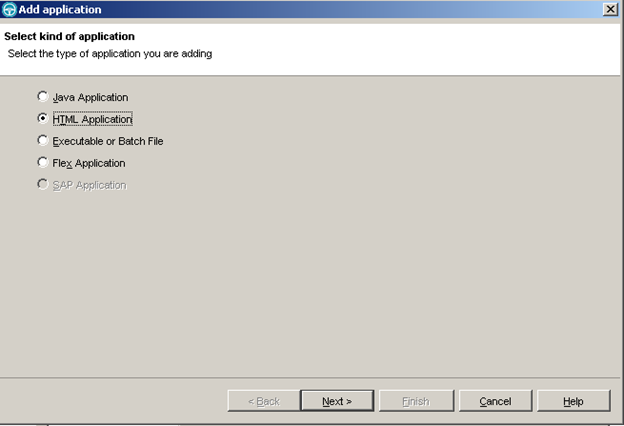
  7. Click the radio button for HTML Application and click Next.
    RFT07
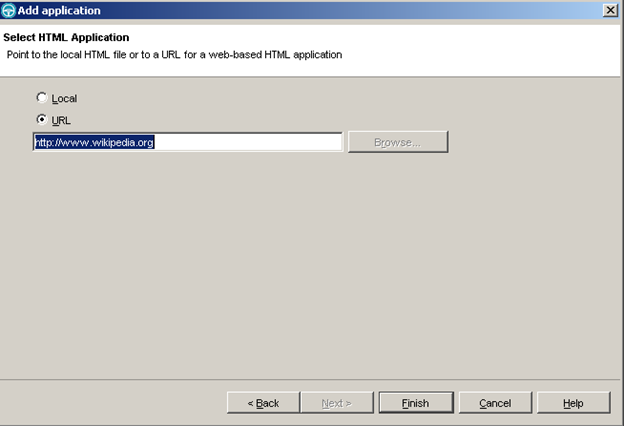
  8. Enter the url and click finish
    RFT08
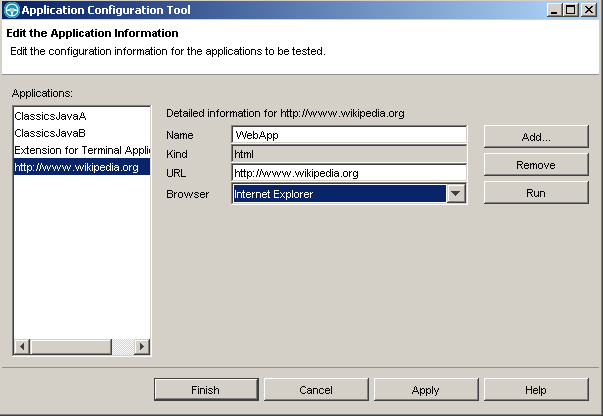
  9. Enter a name and under the Browser dropdown select Internet Explorer. Click Apply then Finish.
    RFT09
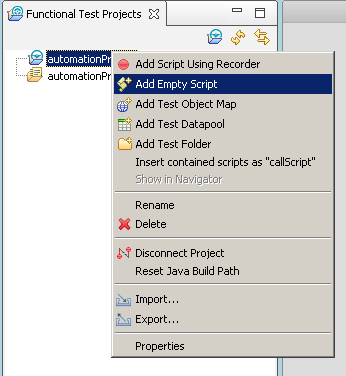
  10. Rightclick on your project and click on Add Empty Script.
    RFT10
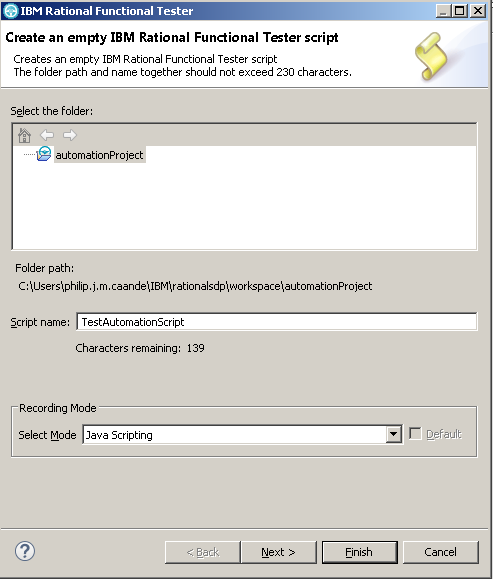
  11. Add a name for your script and click Finish.
    RFT11
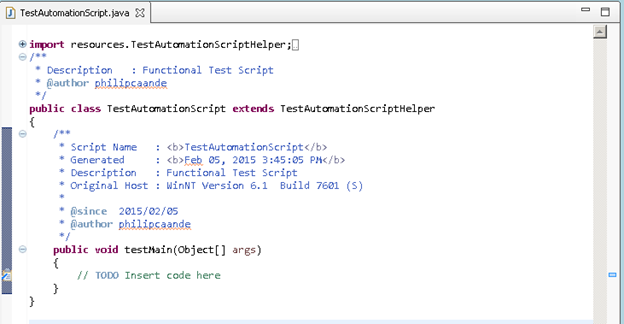
  12. Your automation script will be opened in the editor like this,
    RFT12
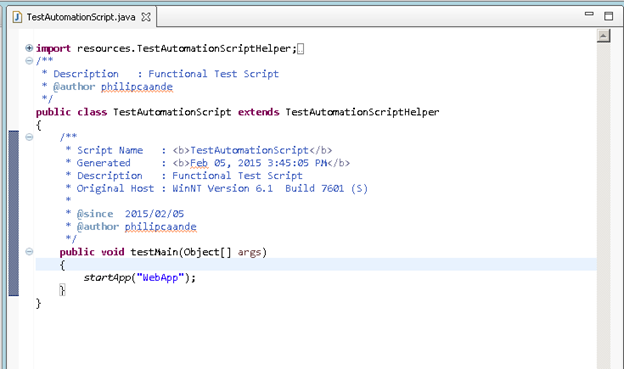
  13. To launch the browser with the URL, use the startApp(“WebApp”); syntax. The string in the parenthesis being the name you entered in step 9.
    RFT13


Next blog I will enumerate the steps to add objects and how to use different actions like click, enter, select, etc.